After a long hiatus, Lori Anderson has brought back her iconic Bead Soup Swap Party, now called the Bead Soup Swap and Create. In this event, jewellery makers are paired up and send each other a bead soup which must contain at least a pendant, a clasp and a mixture of accent beads – the bead soup!
Signups were in January, and I was paired with Israeli beader Yocheved Chana. Sadly my beads have not yet made their way to Yocheved, although I am told by the post office that they are close!
Yocheved does steampunk-style jewellery and she sent me a mixed bag of beads and bits, literally!!! Random brass elements, some stones and evil eye beads, and all sorts of other bits and pieces.
A literal bead soup! So many different things in here — brass components including some steampunk bits and bobs, sew-on Swarovski crystals, evil eye beads, a few gemstones, glass beads, plastic beads, and more!
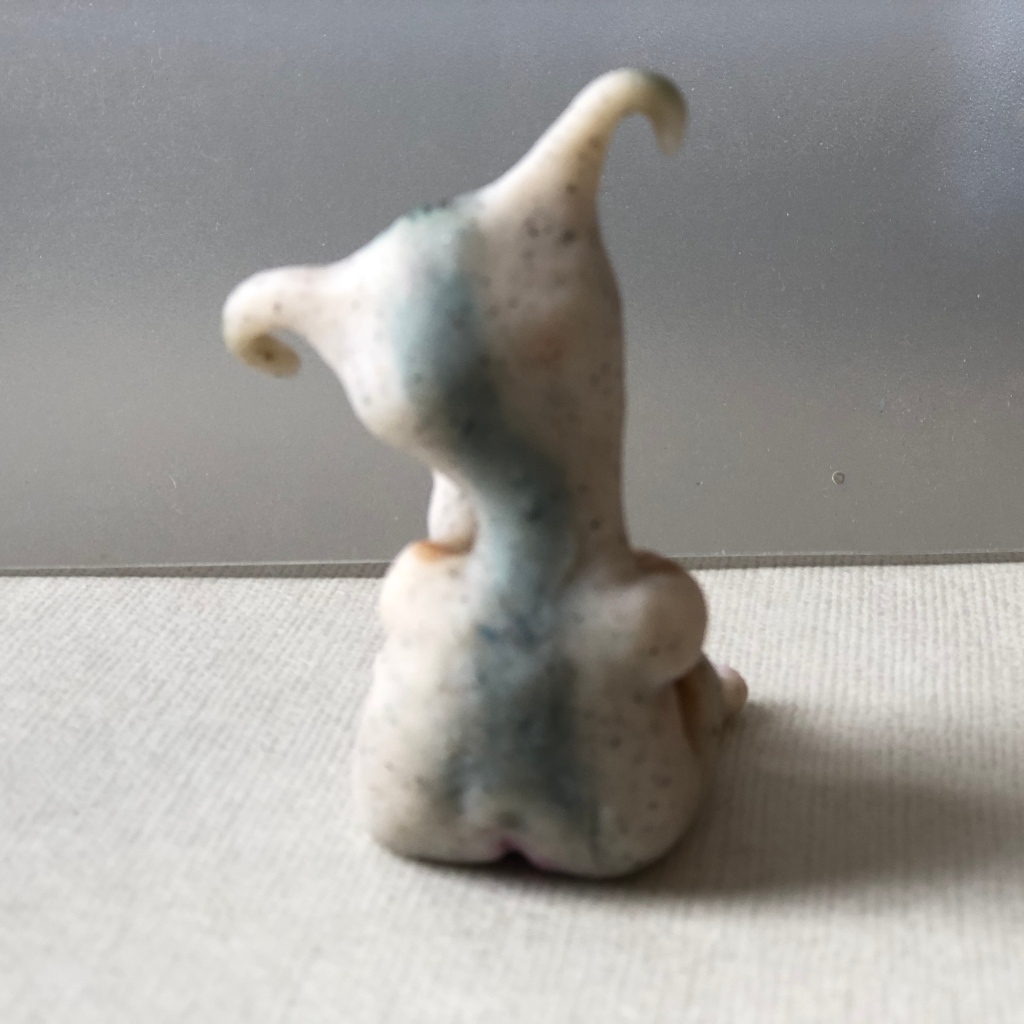
I was immediately drawn to the brass elephant head with its lovely patina as a potential pendant. I punched a couple of holes in the top to give it some stability when strung and added in a couple of the green stones and some long corrugated brass beads from the bead soup. From my stash I added some recycled glass Krobo beads from Kenya (given to me many years ago by a family friend) and some brass elements I had picked up somewhere along the way, as well as a little bit of chain. I couldn’t find a clasp in the soup I was sent so I made it long enough to pop over the head.
Another piece in the soup that caught my eye was a lovely faceted chunk, which I am calling citrine. I added a Green Girl Studios pewter wolf pendant and strung them on a simple leather thing with a knotted cord clasp.
Thanks to the pandemic my studio space has been taken over by my husband who is working from home, and my ability to get in there and make is severely limited, so these two pieces are it for now. Thanks for the inspiration Yocheved, and I really really hope your soup arrives soon (I will update her links once I have them)! And many thanks Lori for organising the swap and getting me inspired enough to make something for the first time in over a year!
Other participants (more than 50!) in the Bead Soup Swap and Create have posted their creations in blogs, on Facebook and Instagram and even on Pinterest. You can visit them all here:
Art Bead Scene’s current Art Journey (number six!) features designs by the great British artist and craftsman William Morris, whose designs form one of the pillars of the Arts and Crafts movement in Britain. Featuring nature at its most abundant, his company Morris & Co, produced intricate designs perfect for textiles, ceramics, wallpaper and more, that are still hugely popular today.
While the Art Bead Scene crew has chosen a couple of Morris patterns as inspiration, I chose to use some faux tin pieces from Heather Powers featuring a Morris image — a trapezoid-shaped pendant and a pair of earring charms in a lovely forest-y pattern of leaves and flowers.
The pendant came with holes in all four corners, giving me a little design challenge. I used a small loop of wire with seed beads and Czech glass leaves, and dangled an antique copper bird from it (part of Vintaj‘s new Artisan Market collection, which includes a number of charms and pendants based on designs by Heather and rendered in metal rather than her usual polymer clay — I was lucky enough to get my hands on this one thanks to the lovely Erin Prais-Hintz!). I added the pendant to some copper chain, but I think I might end up inserting a few wire-wrapped beads into the chain as I feel like it might need something more. The earrings are simple, with just a small flower bud dangling from the faux tin charms.
Thanks for the fantastic inspiration Art Bead Scene!
Earlier this month I took a class with Christi Friesen, something guaranteed to throw me right out of my comfort zone. I have never considered myself good at “art” — you know, drawing, painting and sculpture. Nope, I know I have a good eye for jewellery composition and colour but I can’t draw to save my life. And also, I’m not hugely experienced with polymer clay.
Anyway, I decided to challenge myself and take one of the classes held at The Whimsical Bead at the beginning of the month, and I chose to do the Mystery Specimens class. It was great fun and I surprised myself by (to my oh so critical eye) managing to make a couple of pieces I was quite proud of.
As it so happened, the monthly theme for the Art Elements challenge was Octopus — announced just as I was heading off to the class. I decided that if the opportunity arose I would try to make something octopus-y for the challenge. And as you will see, I did.
But first, the class. Christi’s classes are FUN and this class was no exception. Christi taught us to make odd little creatures, destined for life in a bottle — mystery specimens! My first specimen is quite endearing I think, he’s almost hiding behind his hand. The clay is a mix of glow-in-the-dark and granite (although I haven’t really tested whether it really glows in the dark), and I kept the surface decoration simple, a stripe down the back and some shading. The thing that really makes these critters come alive is the use of little glass eyes, it really gives them personality!
He’s meant to be in a jar, but I couldn’t get a good photo. He’s got a dimpled bum!
Next I made a mer-creature, with a tail fin and a ridge down his back. Christi showed us how to give them an angry expression — this guy is not happy to be trapped in a jar!
Let me out of this jar!
Finally, I had enough leftover clay to make an octo-critter. She’s not just any octo-critter though, she has two faces, and has overdone the red lippy a bit!
yes her ear is a little broken, oops!her other faceSide view of Octo-critter — she looks like she’s declaiming something!
I really enjoyed taking Christi’s class, it was a great stretch for me, and next time she’s in Australia I might have to take my Mum and my sister along to play as well, I think they’d love it! And thanks to Dani and The Whimsical Bead for hosting the class.
Don’t forget to pop along and visit some of the other bloggers taking part in this Art Elements Challenge. Here’s the list, to make it easy!
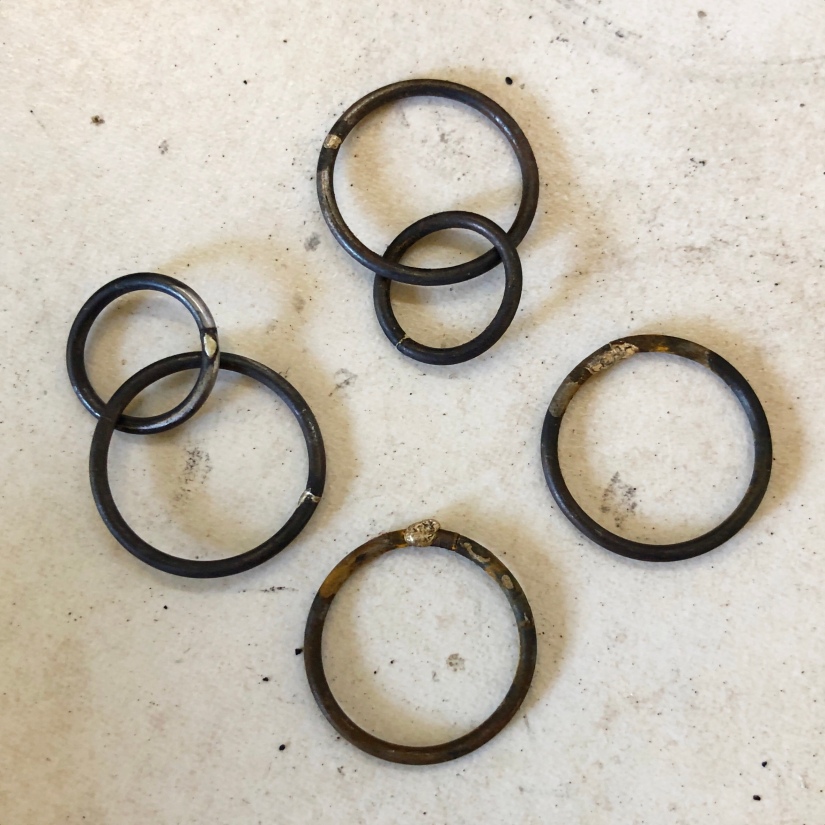
One of the guys at work asked me if I could make an iron necklace for his wife as an anniversary present. He’d seen a few designs on Etsy with two interlinked rings and wondered if I could do something similar. Sure, I said, I think I can come up with something. Thankfully he is a graphic designer and understands that to get something right takes time, because it took me a while to figure out everything I needed to do to successfully create the piece! It was an excellent challenge for me though, forced me right out of my very small comfort zone!
First of all, what kind of steel did I need to use? My customer wanted “iron”, so it needed to be blackened steel. I finally found dark annealed steel at our local big box hardware store — here it’s known as tie wire, but is more usually galvanised, not dark annealed. Thankfully it was 1.57mm diameter, not too hefty but also thick enough to be useful.
I’ve got enough wire to make hundreds of rings!
As it was already annealed, it was easy enough to form coils of wire around two marker pens of different diameters and saw through the wire to make jump rings. The ends were filed smooth and wiggled together so that they touched. My plan was to use one bigger ring and one smaller ring to represent my tall customer and his petite wife.
The next challenge was soldering the steel — I wasn’t sure whether I could use the normal silver solder I use for soldering sterling silver. And what flux should I use, what pickle? I found a tutorial on the Facet jewellery making website that used hard silver solder wire, and suggested that white paste flux might work, so I gave it a go. That was my first failure. No matter how hard I tried, I couldn’t get the solder to join the ends of the steel. The rings would look joined but when I tested the join it’d pop right open.
A bit more research said I needed flux that took a higher temperature. Off to the hardware store again to buy some black flux, rather nasty looking stuff! This worked OK, but the hard solder meant that I had to heat the steel for quite a while to get it to melt. And the flux left a rather crusty finish on the steel and pickling it (in a mixture of hydrogen peroxide and vinegar) didn’t seem to move it. Plus the solder was a bit lumpy-looking and, well, it just didn’t look great.
Some of my test runs, at different stages of cleaning up the rings. Some of them looked pretty crusty!
Still, I was able to take it to my customer to make sure he was happy with the concept, so that was a win. I just wasn’t sure I’d be able to get a good enough finish on the rings.
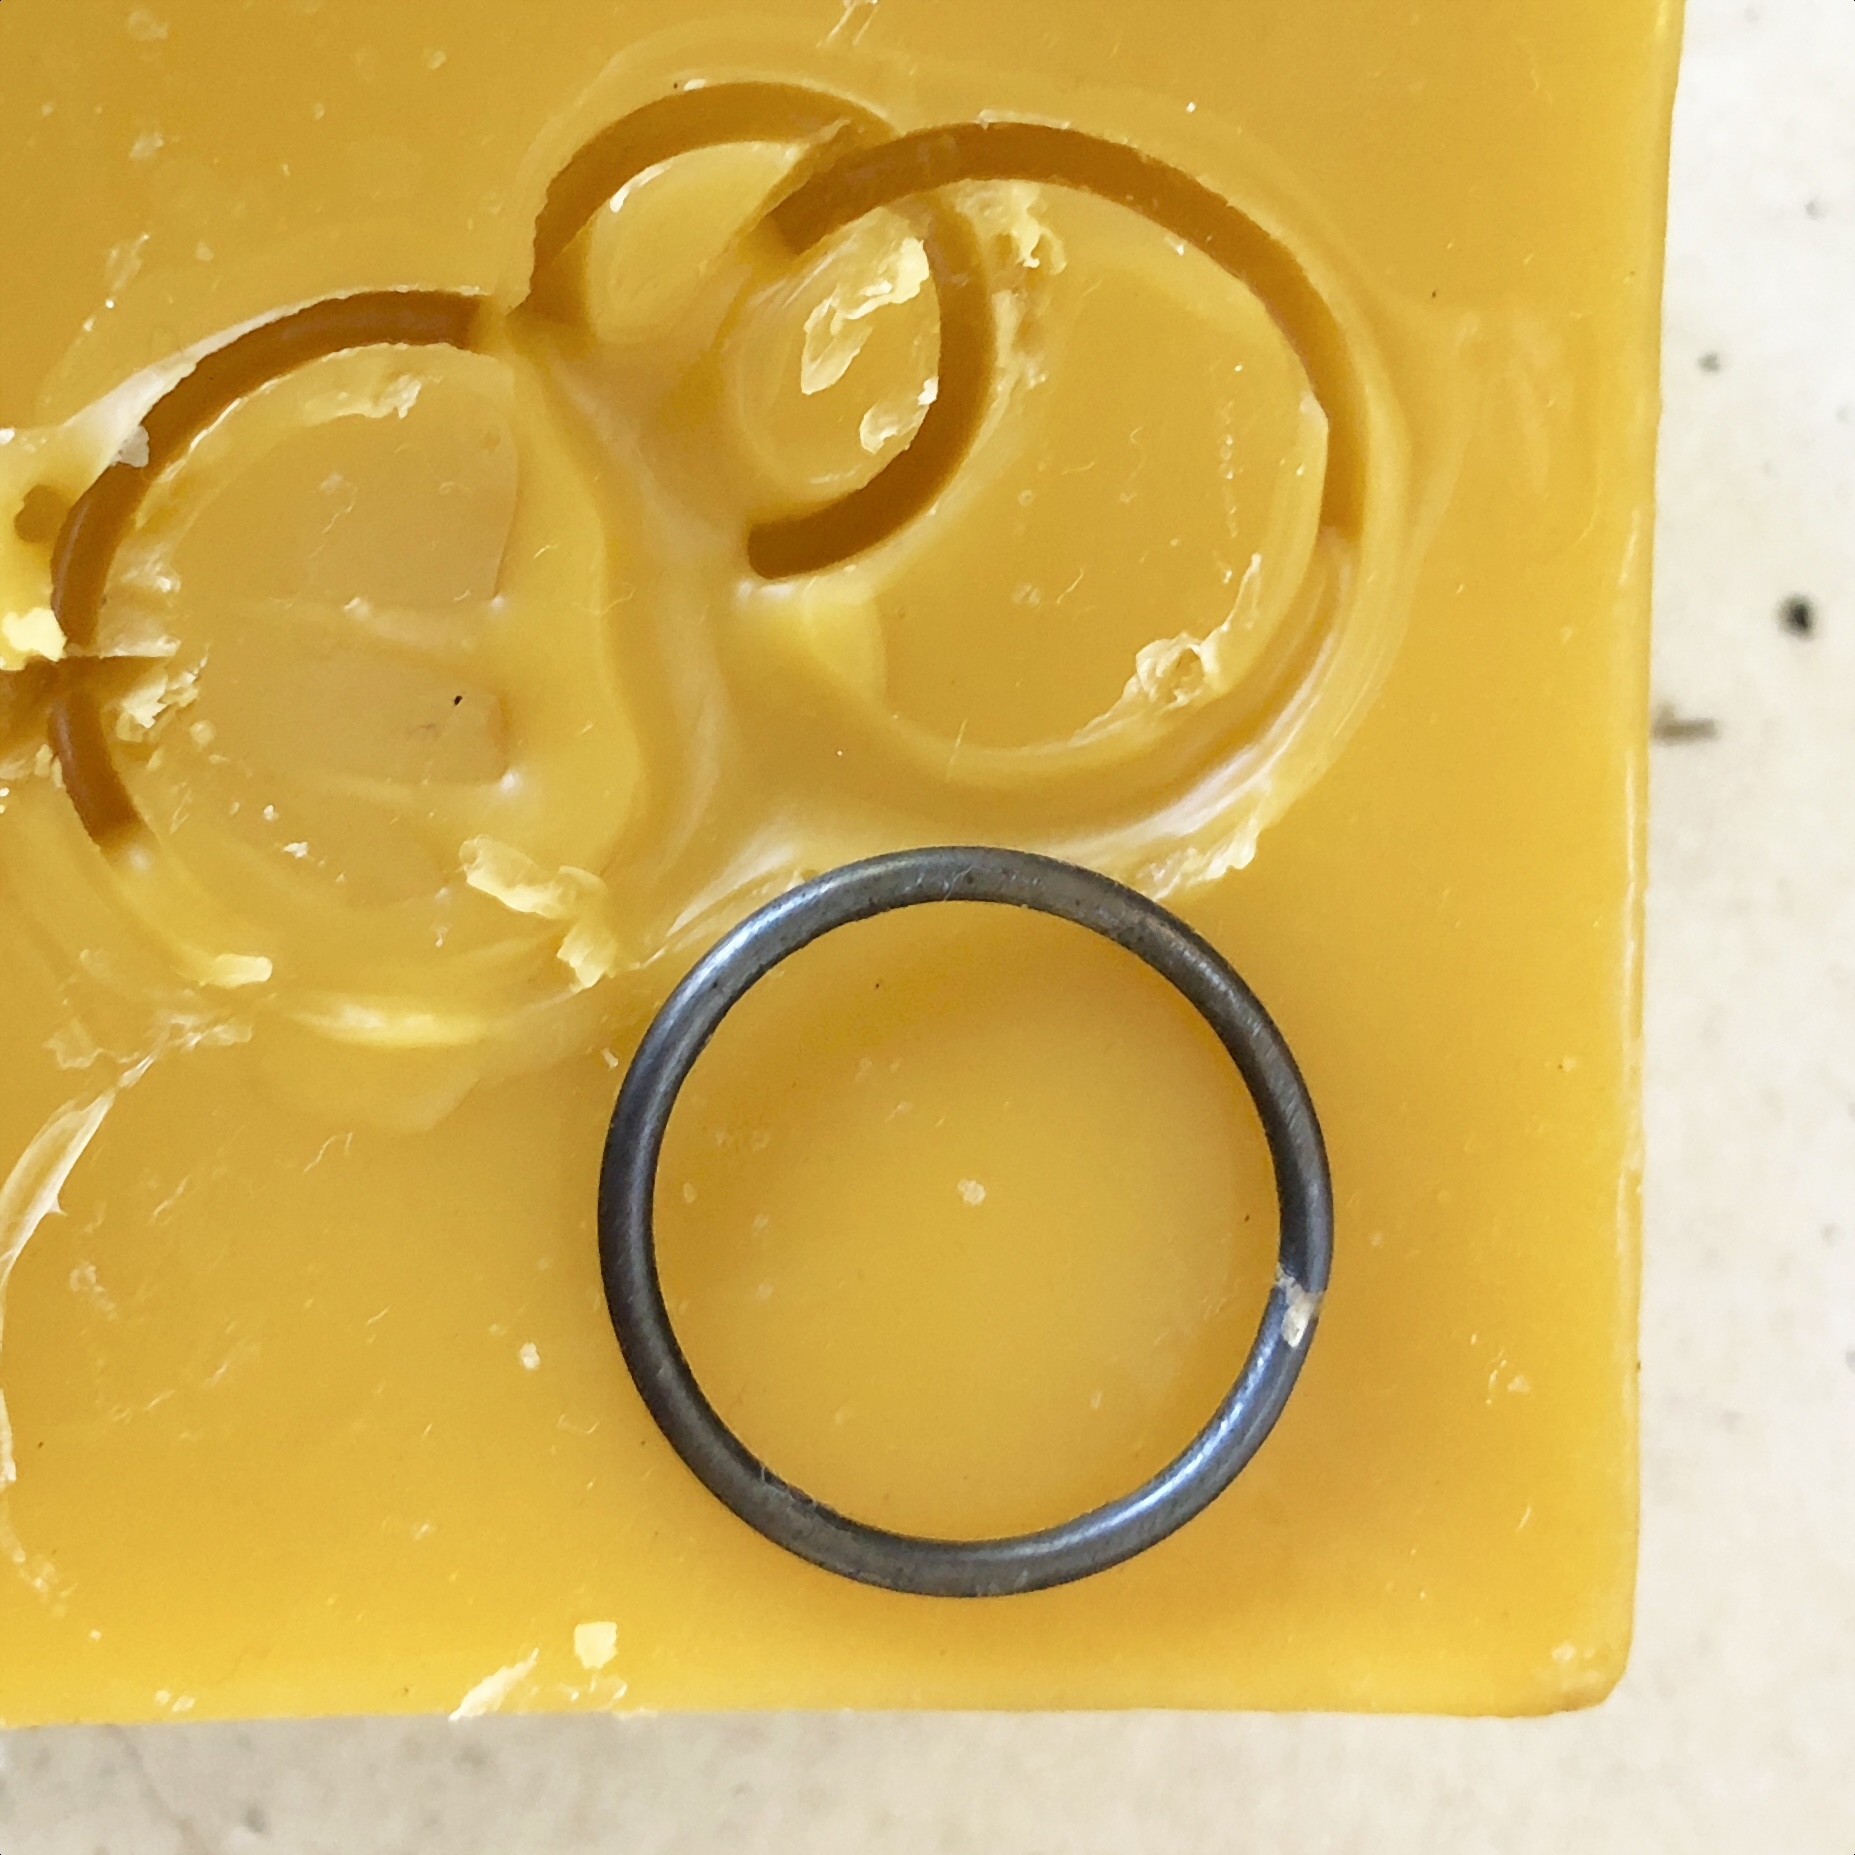
These have been sanded back to the natural grey of the steel.
So I went back to the internet to do a bit more research. And hallelujah, I found a fantastic Facebook video by Brenda Schweder that used solder paste with no extra flux required. So I made up a bunch more rings and got busy with the torch. Finally I had a method that worked, with minimal solder used and not too much heat needed. This last point was important, as the longer the steel was hot, the more the metal surface seemed to suffer.
On to the next challenge: how to clean up the rings and then darken the steel again. After a quick pickle, I sanded the rings with 400/800/1000 grit emery paper. This of course took the steel back to its natural colour — see the picture above. Once again the internet came to the rescue! Searching for methods I saw a video in which a large steel piece was heated and then coated with beewax while hot. The beeswax was then buffed off. Adapting this, I quickly heated up the steel rings with my torch, picked them up and dropped them onto my block of beeswax, then pulled out the rings using some tweezers and buffed the wax away with a soft cloth. This darkened them nicely (and pretty much instantaneously), phew! I also played around with using some black gilders paste to cover up the silver solder seam but that didn’t work really well. Finally I used Renaissance wax to seal the rings so that hopefully they won’t rust. It also gives the metal a nice finish.
My test ring on the beeswax
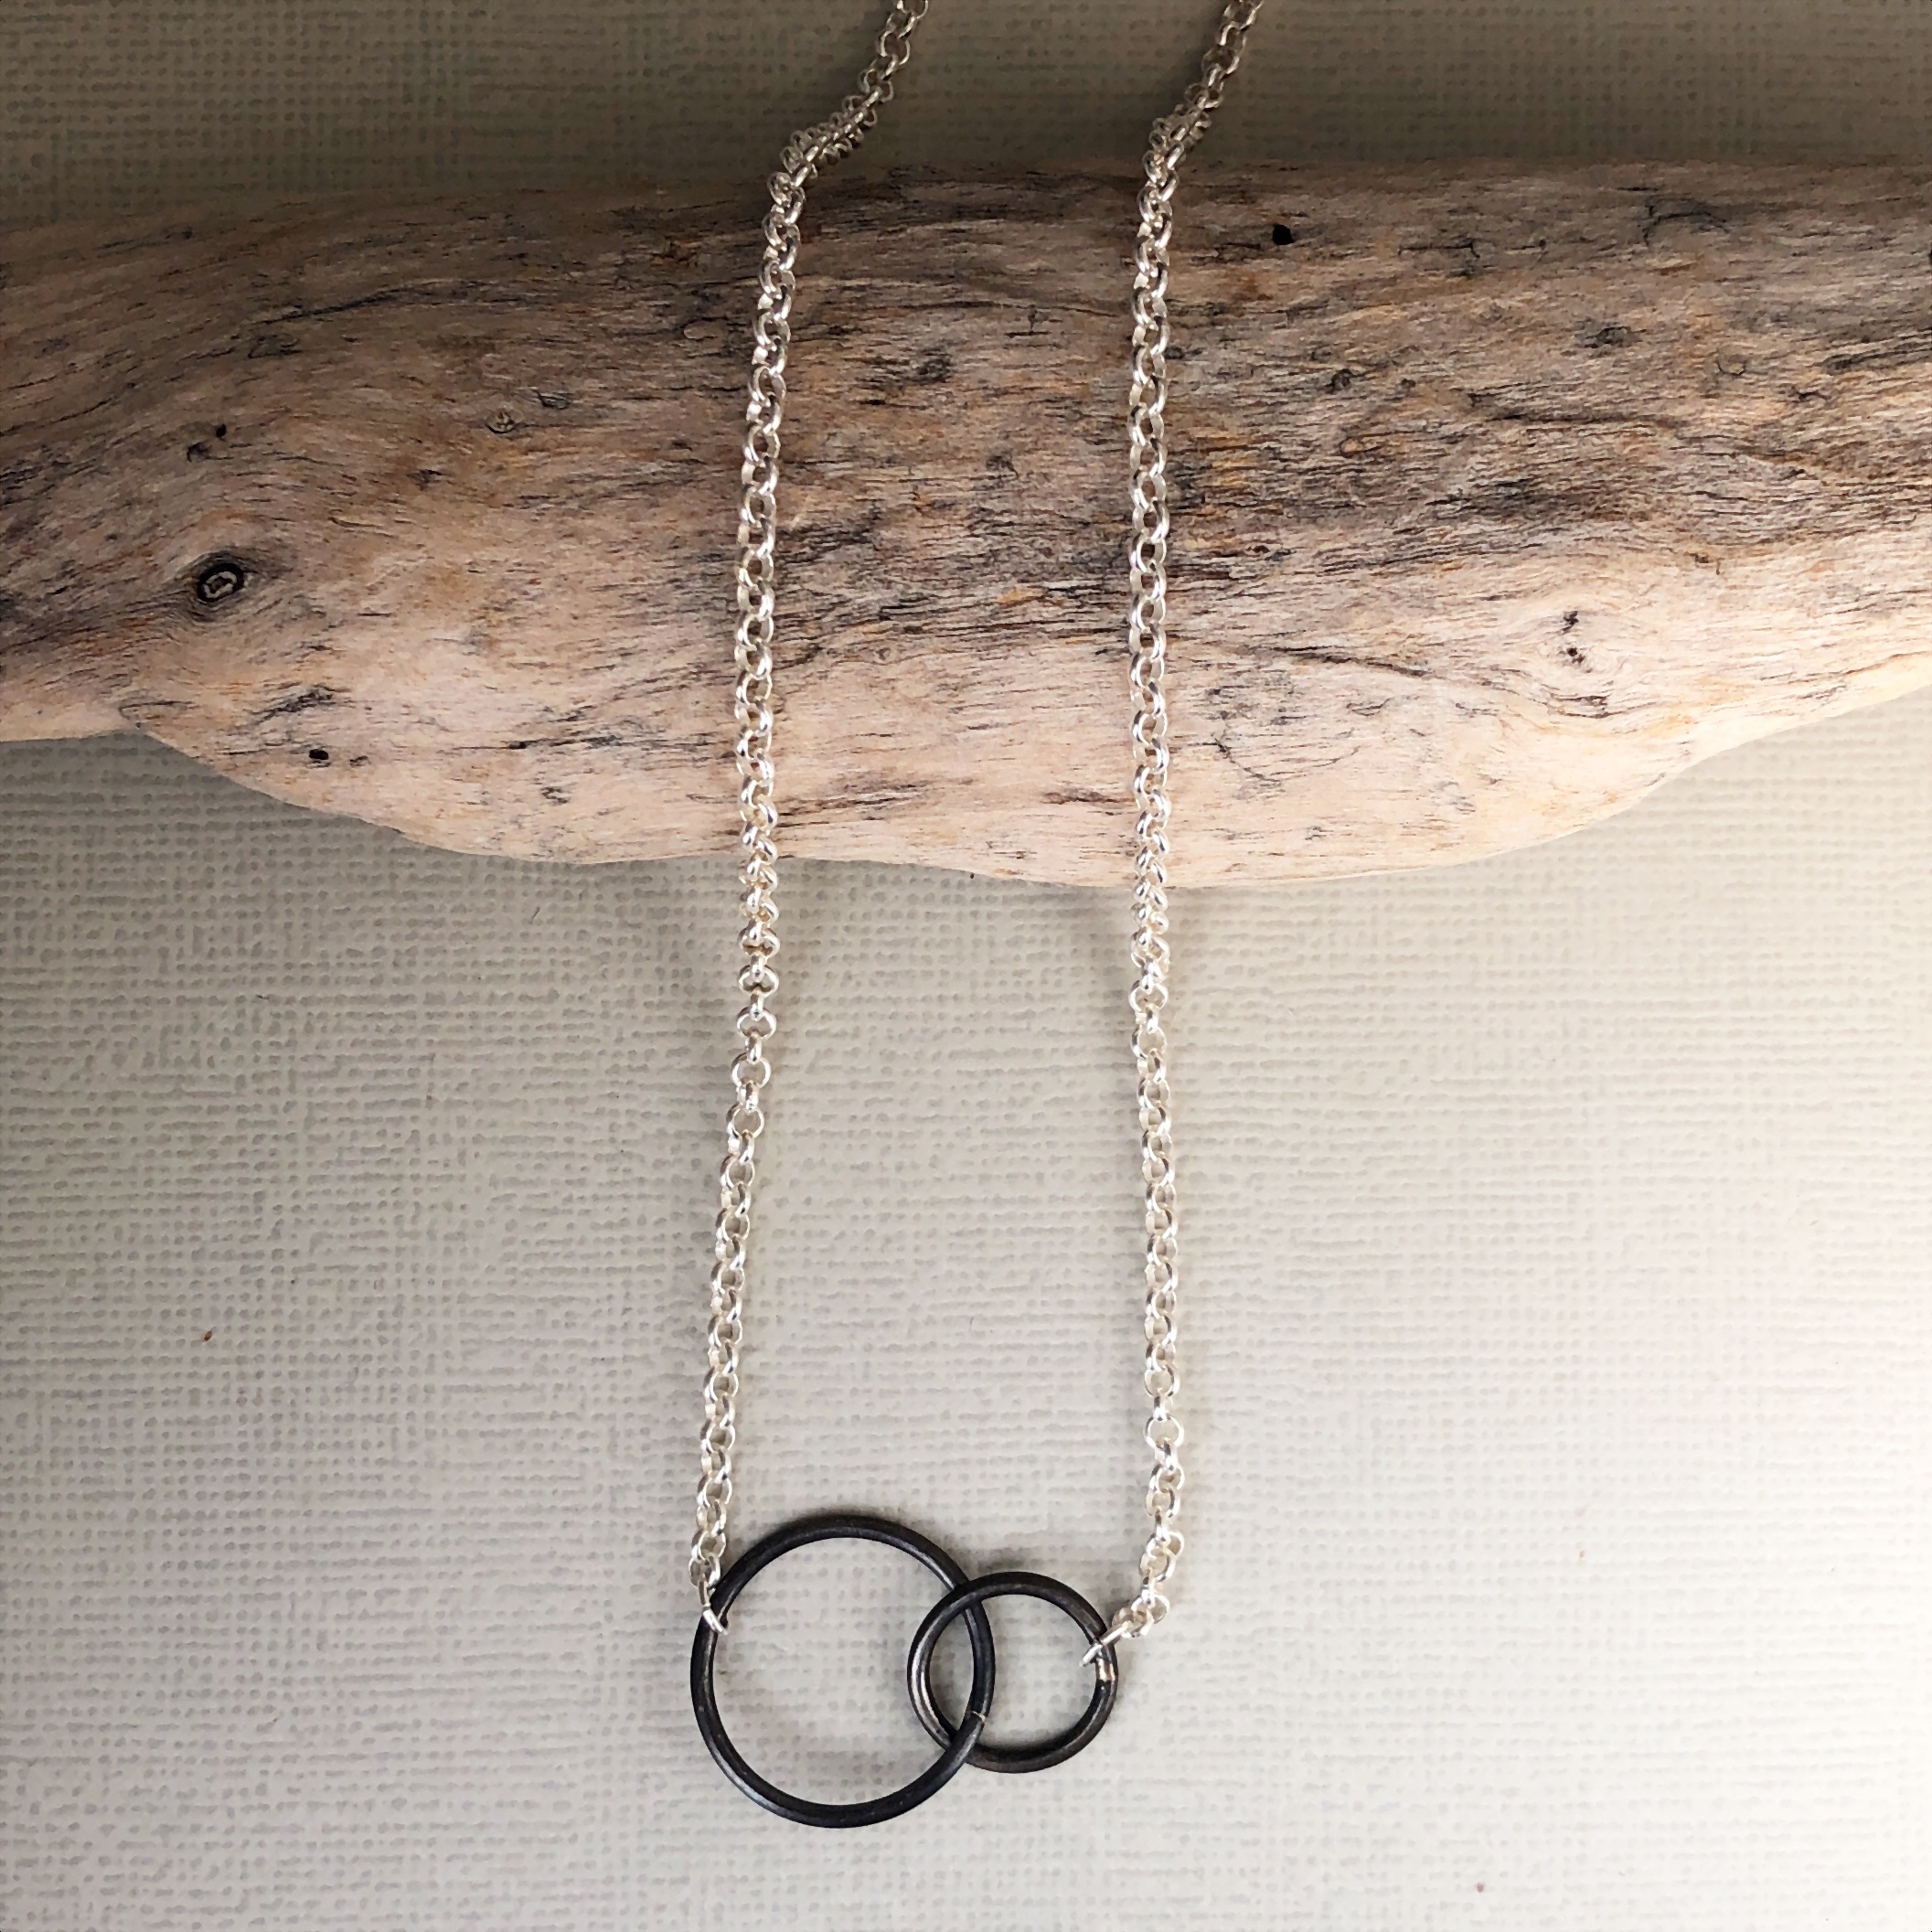
The final step in the process was to add a sterling chain. The necklace is short so the rings sit right at the collarbone.
Et voila! The finished necklace really shows the contrast between the dark steel rings and the bright sterling silver chain. While you can still see the soldered join, it’s flush with the surface of the rings and doesn’t stick out like a sore thumb!
I think it turned out rather well, and I learned an awful lot about the steel-soldering process! Happily I’ve heard that the recipient loves it! I’m thinking that it might be fun to make a few more of the steel rings, and maybe use them for earrings, perhaps even solder earring posts onto them. I don’t think it will be my first choice of metal to use, but hey, now I know I can do it! A very big thanks to Brenda Schweder and her wonderful video!
It’s reveal day for this month’s Art Elements Challenge and the theme for July is flowers. I have plenty of floral beads in my stash, but with not much time to make, I thought I would use a couple of pairs of ceramic charms from Natalie Fletcher-Jones. She has been making some fun new styles featuring petals, which she sells through Facebook at a few different groups.
For each pair, I have kept things simple, letting the charms be the hero of the design. The first pair drove me crazy trying to wrap the little teardrop beads, until I realised I had some fine jumprings that I could thread through the holes. Phew!
And for the second pair, I went even more minimalist, just dangling the charms from a coordinating bead. Easy-peasy but quite sweet.
Please forgive the somewhat dark photos, there wasn’t much light left by the time I took these pictures!
This challenge is a blog hop with plenty of other designers joining in. Please visit them if you can!
After missing Art Journey Three due to family events, it’s lovely to get back to creating with art beads. Art Bead Scene’s Art Journey Four features the art of Odilon Redon:
Bertrand-Jean Redon was commonly known as Odilon Redon (April 20, 1840 – July 6, 1916). His nickname was derived from his mother’s name, Odile. He was a Symbolist painter and printmaker, born in Bordeaux, Aquitaine, France. Redon is one of the most important and original of all the Symbolist artists. Symbolists relied on dreams, emotions, ideas and feelings. They valued the artist’s reveal of their own personal truth. Redon’s work was visionary and focused on the world of his own personal dreams, imagination and fantasy. Redon believed that art could transcend the everyday and open onto a marvelous world of the mind.
— Art Bead Scene Studio
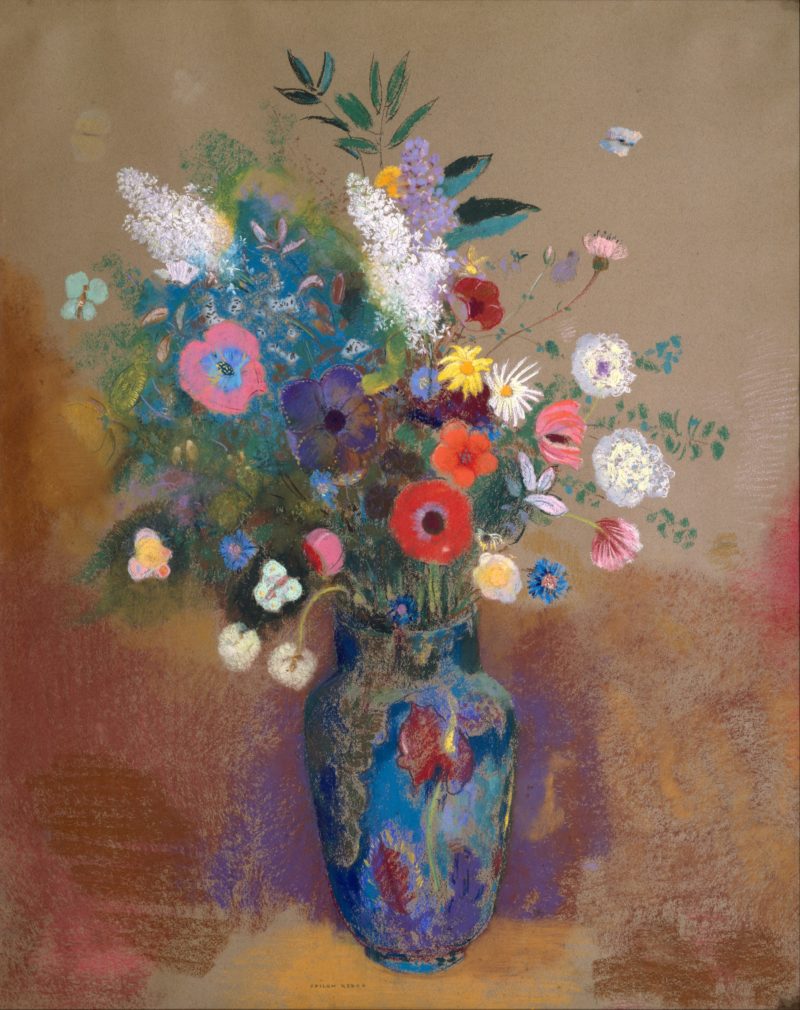
The ABS team chose three of his works as our inspiration for this journey, and from these I was most drawn to the painting “Bouquet of Flowers”. I love the variety of different blooms all randomly gathered together in the vase — it’s my kind of bouquet — and the palette and dreamy style evokes the beauty of the flowers.
Bouquet of Flowers, 1900-1905 The young Redon was fascinated with Darwinian biology. His late still lifes like this one show a keen naturalist’s eye paired with a vivid imagination. He combined many types of blooms in an explosion of color and shape, much like fireworks in the sky. The vase that was used frequently in such paintings came from his ceramacist friend Marie Botkin.
Around the same time that this Art Journey began, Gaea Cannaday released a series of floral pendants featuring wildflowers, and they really remind me of this painting. I was lucky enough to score a few of them and used two to make necklaces.
The first necklace features flowers spilling out of a vessel, a bowl or vase. I added a chain of Czech glass flowers in different shapes, colours and sizes, knotted onto waxed linen and finished off with a bit of chain around the neck. Note the little bird bead on one side and ceramic round on the other side, which came with the pendant — Gaea makes delightful little bead/pendant sets for her Facebook group sales.
The second necklace uses a pendant made of dark brown, almost black clay, with flowers reaching up like wildflowers in a field. I added two-holed Czech glass flower beads with seed bead spacers and a dragonfly clasp. I wasn’t sure if the flower beads would work the way I wanted them to but it looks amazing! I think I might end up keeping this one for me.
I really enjoyed making these two necklaces, so thank you Art Bead Scene for the inspiration! I’m looking forward to the next Art Journey!
Art Bead Scene’s Art Journey Two is about to end, and I’ve just managed to slide in under the wire! This Journey has focused on the illustrations of Virginia Frances Sterrett, an American artist whose short career illustrating fairy tales flourished during 1920s. Sadly she died of tuberculosis in 1931.
Art Bead Scene selected three of her fairy tale illustrations as starting points for this challenge, and I chose Proserpina and the Sea Nymphs, an illustration in the book Tanglewood Tales (1921), as my inspiration for this necklace.
Proserpina and the Sea Nymphs From Tanglewood Tales (1921) illustrated by Virginia Frances Sterrett
The focal is one of Jenny Davies-Reazor‘s amulets, a polymer clay shadow box containing a pearly shell much like the shell held aloft by one of the sea nymphs in the illustration. The pale aqua and teal colours of the illustration, which darken to an inky blue almost perfectly match the colours of Jenny’s amulet. I added a small length of English cut Czech glass beads in frosty aquas, and finished it off with a length of bright copper chain, which provides a lovely contrast to the blues much like the coppery colours of the kelp in Sterrett’s artwork.
I do wish I had time to make some more pieces based on these illustrations, they are so rich with pattern and colours, very inspiring! Thanks again Art Bead Scene! I’m looking forward to Art Journey Three!
It’s reveal day for the Art Elements February challenge and this month’s theme, chosen by Cathy Spivey Mendola, is Birds of Prey. My bird of prey of choice is the owl, although my owl is definitely on the cute side rather than the formidable side!
I picked out a small owl pendant by Erin Prais-Hintz from my stash, and knotted it up with a selection of Czech glass beads on orange waxed linen, finishing it off with a little brass chain around the back of the neck. It’s a simple piece, but with the blue and orange colour scheme quite striking. The back of the owl is stamped “hoot hoot”, hence the name of the piece.
And at the very last minute while I was putting things away, I found a pair of earring charms from Humblebeads in her faux tin style, with owls (I had been looking for them but they were in a place I didn’t expect to find them!). I love making earrings, they come together so quickly.
Thanks for the theme Cathy, owls are a favourite around here, and even the cute ones are predators. This is a blog hop, so please have a look to see what others have been inspired by the theme to make:
Here we are almost at the end of February and I’ve managed to make my second ring. The theme this month was Music and Lyrics and I have to say, it was a tricky one! In the end I decided to go for a simple stamped ring band. But then the next problem was: what lyrics could I stamp on the ring?
The artist was easy, I’ve long been a fan of Paul Kelly, an iconic Australian musician whose lyrics are evocative and poetic. However, Paul Kelly has a back catalogue of hundreds of songs. I really would have liked to do the iconic line “From little things, big things grow” from the song of the same name but it had too many words for a ring! Maybe one of these days I will decorate a bracelet or a necklace with those words.
Instead I pulled a line from a song that always reminds me of the early days with my husband, We’ve Started a Fire, both because of the lyrics and because the album came out at that time, so we would listen to it a lot.
The lyrics in the second verse are:
Kiss me, then let me go before the sun is high
One kiss—one spark!
Danger when the powder is dry
We’re just two children playing with matches
Hidden from the world
We’ve started a fire
We’ve started a fire
We’ve started a fire
We can’t put out
(Paul Kelly 1994, from the album Wanted Man)
The ring is made with a pewter ring blank from Beaducation and stamped with the second line above — one kiss one spark — I stamped it on the flat blank and then shaped it.
As you can see, I actually made two rings, one for me and one for him.
Next month’s theme has just been announced — you’ll have to wait and see what it is. But I think it’s time I started playing with fire, don’t you think?
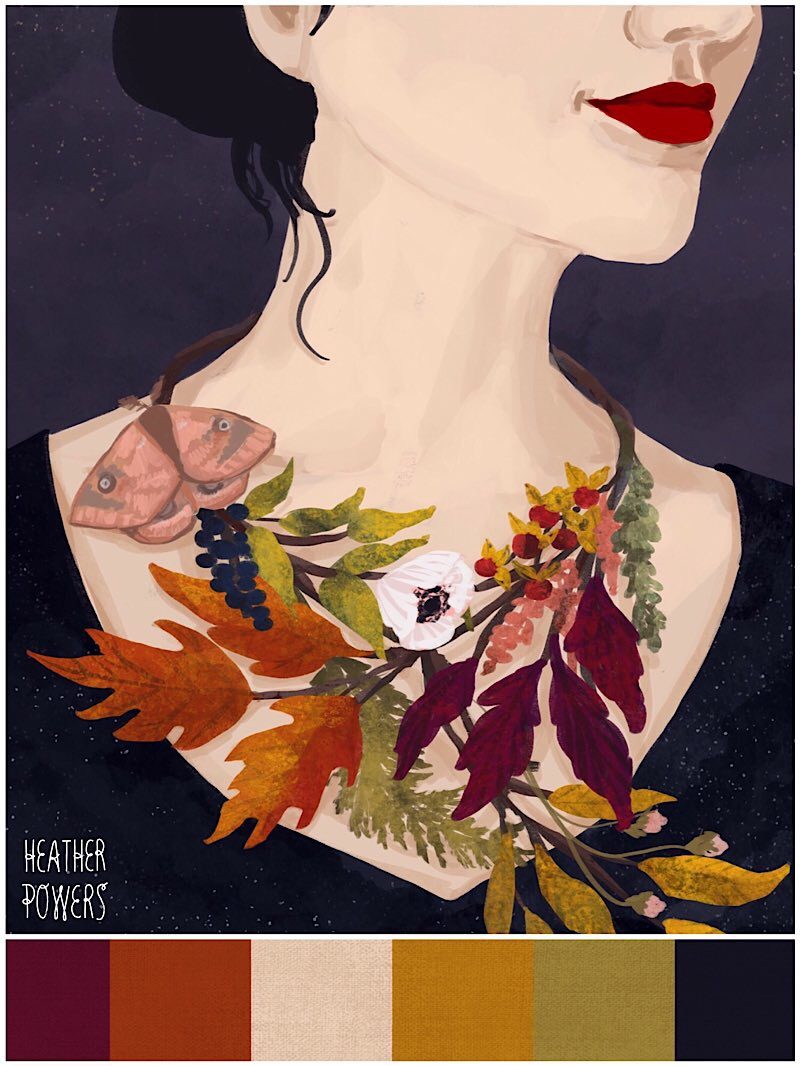
I love drawing things that nurture the soul, relish in the simple life and celebrate the every day.
I created this piece to represent the light within each of us, our ability to be kind, loving and uplifting and how that will attract beauty to us.
I decided to focus on Heather’s moth and butterfly theme for this piece, rather than the colour palette, and pulled out a cute set of beads from Gaea Cannaday to use in a necklace. The colours aren’t quite the same as those in the illustrations, I went for a slightly brighter, summery palette. I also took inspiration from some of Heather’s simple, sweet necklaces, making a tassel using some chiffon ribbon and stringing the pendant I made from the tassel and beads on natural leather.
Thanks for the inspiration Heather, can’t wait for the next Art Journey!